Sunday, July 31, 2011

OWH - Sketch Challenge # 80

Happy Sunday!

I finally got some crafting time and made a card using the Operation Write Home Sketch 80. They post a weekly challenge with a sketch to get you started, see here to get you started.

Here's my flavor of the sketch:


The finished size of the card is A2 (5 1/2 x 4 1/4). The background paper and two solid pieces are from a coordinating set of 8 1/2 x 11 paper that I got for Christmas in an exchange and I can't remember who it's by.

The sentiment comes from the Discover Palette title stickers and the flower is from Reminisce paper flowers and both are from Creative Memories.

I gave the flower some dimension by using a pop-up dot.


Hope you all enjoy your upcoming week! Be safe!

Tuesday, July 12, 2011

OWH - Sketch Challenge # 77

Good evening,

Operation Write Home Stars and Stripes blog posted a new sketch challenge. Sketches are layouts with dimensions that can be used in card making. This challenge is for new sketch # 77.


The circles are cut using the circle cutting system patterns from Creative Memories. The inside track was used on all three patterns and cut using the red blade. The dimensions are 1.5, 2.5, and 3.5 inches.

Background paper is from the Recollections All Seasons pad. The card stock is generic card stock and the brads are from Michael's. The finished size of the card is A2 (4 1/4 x 5 1/2).

Have a great evening!

Robin

Saturday, July 9, 2011

Christmas in July - OWH Mid-week challenge

Happy Saturday Everyone!

Every week Operation Write Home Stars and Stripes has a mid-week 'throw down.' This weeks challenge was Christmas in July.

In addition to using the Christmas theme, I also used Sketch # 1 for the layout.


The finished size is A2 (5 1/2 x 4 1/4). This was my first use of the Sew Easy tool that I purchased on my trip to Chicago and I have to say that I like the stitching. For this card since I wanted to the hint of blue to pull in the snowflake, I used a continuous stitch instead of a normal stitch pattern.

The snowflake is from the Creative Memories cartridge Cheerful Seasons. It is cut at 2 1/2 inches. All paper is generic card stock, except for the silver background for the snowflake. The paper is from an assorted paper pack that I purchased from Big Lots.

I used dimension stickies to raise up the snowflake for some added dimension.


I hope everyone has a safe and restful weekend, until next time.

Robin

Sunday, July 3, 2011

OWH - Challenge # 16 All About Animals!

Okay, this is the last card of the night. I'll catch up on the remaining 11 cards tomorrow. But I'm very excited because this will be my first batch of cards that I will send in to OWH.

The instructions for this challenge are on MousePrint Creations.


The puppy is from Create a Critter and is cut at 2.5 inches. The background paper is from Creative Memories the Discover palette. Yes - all the mentions of the Discover paper has all been from the same 12x12 sheet. Finished size is A2 (5 1/2 x 4 1/4).

More cards tomorrow - have a good evening and a safe Fourth of July!

OWH Challenge #14 - Color Me Crazy

Here's my catch up card for challenge #14 - Color Me Crazy. The instructions are on My Craft Central.


All cuts are from Create A Critter and are cut at 2 inches. The background paper is from Creative Memories - Discover palette. Finished size is A2 (5 1/2 x 4 1/4).

More to come, still catching up.

OWH - Challenge # 15 Play on Words

Here's the card for challenge #15 - I have about an hour till the next challenge posts, so I'm hoping to get challenge 13 and 14 done - my hubby wanted to go out to eat - so I missed them.

The instructions for this challenge are on Stamping with a Mission.


The bat is from Happy Hauntings and is cut at 1.25 inches. The finished size of the card is A2 (5 1/2 x 4 1/4). The sentiment is from My Pink Stamper the Spooky Puns set (this is the first time using the set). The background paper is from K and Company their Halloween stack.

On to the next challenge......

OWH - Challange # 12 - Food and Fruit Theme

Here's my card for Challange # 12 - Food and Fruit Theme - directions under Sarah's Stamping and Stuff


All cuts are from Just Because Cards. The apple is cut at 6 inches and the sentiment is cut at 5.5 inches. Final Size of the card is A2 (5 1/2 x 4 1/4). Inside the card I have stamped 'Thinking of You.'

Operation Write Home - Weekend Challange

Hello all,

It's been a while since I posted. Live got a little crazy. But this weekend I'm participating in a challenge put on by Operation Write Home for their Virtual Card making Party.

Operation Write Home is a not-for-profit group who collects handmade cards from all over the US and sends them to deployed troops. The soldiers use them to write home to their families. This is a wonderful opportunity to give back to our troops overseas.

I wasn't able to participate yesterday, so hopefully I can catch up. But here's the card from the 9 am challenge - Pinwheels.


The instructions for the challenge are on Hello From Kate.

My Pinwheel is cut from a 3x3 piece of Creative Memories paper - the Discover palette. The background is also from Creative Memories - Discover. Finished size is A2 (5 1/2 x 4 1/4).

More cards to come.......

Monday, March 14, 2011

My first award!

I have been away form the blog for a while, so I actually got this around Feb 14th and I was super excited to receive it!

I am so thrilled and honored to receive this award! Special thanks to Ashley from Welch Creations for giving me this award!


The Liebster Award is designed to bring new blogs to light. It is a great way to share blogs that might not otherwise be seen or ones you may want to share with others. I am here to honor 3-5 blogs to bring awareness to other wonderful blogs.

As a recipient you must share the love and pay it forward by:
1-Creating a post where you blog about the Liebster award & reveal your 3-5 blog picks
2-Let them know you chose them
3-Copy & paste the blog award on your blog
4-Have faith that your followers will rally & show their crafty love back out to those you awarded
5-Have fun!

My 3 picks:
Alex @ You Had me at Craft
Wendi and Meriah @ Two Scraptastic Gals
Jalisa @ Patches of Pink

Please be sure to pay these wonderful crafters a visit by checking out their blog! Congrats ladies! 
Later,
Robin

Monday, February 14, 2011

Happy Valentines Day!

Good evening all,

I hope your day was wonderful and filled with family and friends. I just wanted to share the card I made for my wonderful hubby, who just happened to get me paper for v-day (isn't he awesome!).

I didn't share this earlier because I didn't want to spill the beans about his card.

I decided that I enjoyed the Shutter card so much, that I wanted to make his card a Shutter card.


The Shutter card folds up to A2 size envelope (5 1/2 x 4 1/4).

Recipe:
Base is black generic card stock
All the colored paper is from Recollections All Seasons slab - in fact the red paper is all from the same piece of paper the black flower things were the corners of the paper and then the red paper with the strips is from the sides.
The center piece of red card stock was a scrap I had.
The heart was cut from Gypsy Wanderings at 2 - 3 inches (can't remember). I cut it from white card stock and then colored it gold with my Creative Memories gold wide tip pen.
The stitiching around the different panels is the Creative Memories gold fine tip pen.

I enjoyed making the card and he even got some compliements at work because I asked him to put it on his desk.

Have a great evening!
Robin

Sunday, February 6, 2011

Shutter card - birthday card

Good Superbowl Day all,

Hope you are all having a wonderful day.

Last night I was cruising around the various blogs that I follow and the Christy Blade Handmade blog had a Valentine's Day card called a 'shutter card.' I had never seen this design before, so of course, I Googled it.

One tutorial and one trial run later, I decided I had to try it out for real. As luck would have it I need another birthday card this month, so I used the Shutter card technique.

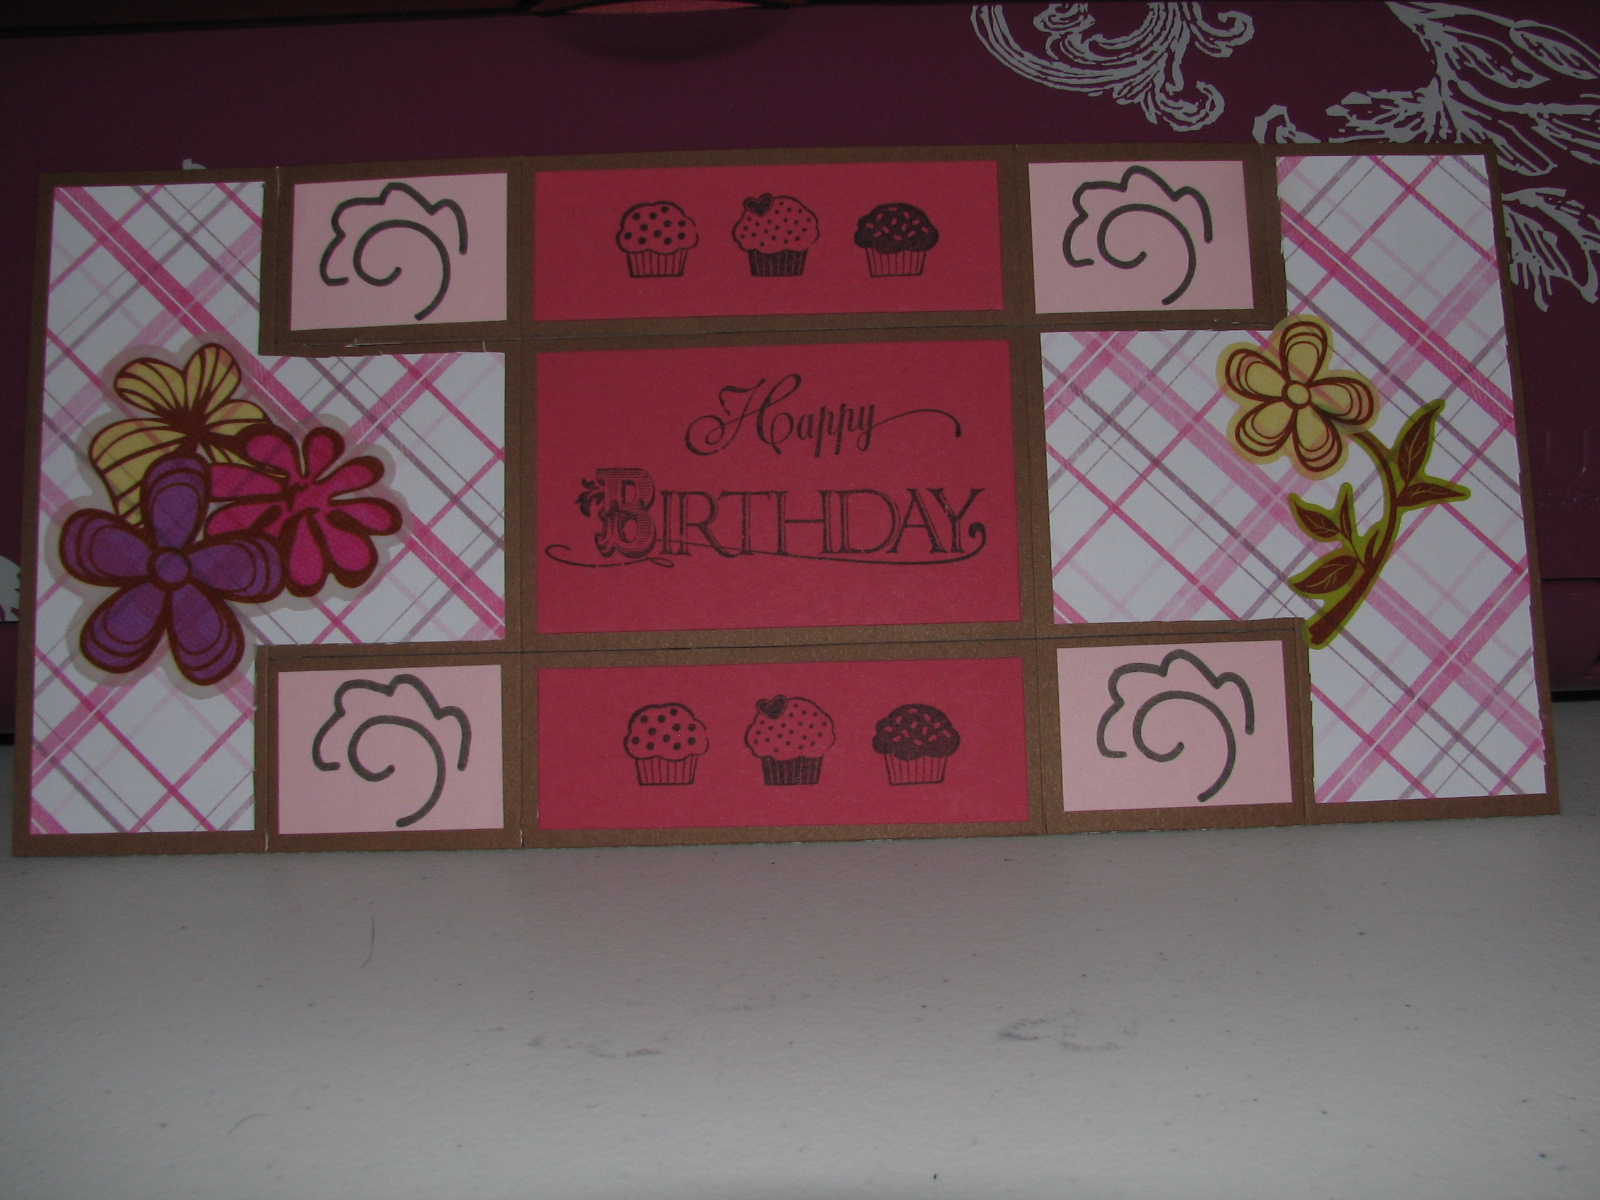
Here's the finished product and below I'll have the basics of making the card and my recipe.


The card itself is 5 1/2 x 12 inches and folds up to an A2 size card.

Cut the base and the score the card at 2, 4, 8, and 10 inches. Then measure 1 1/2 inches from the top and the bottom and make a cut along the length of the card from the 2 inch score to the 10 inch score.

I decided that my life would be decidedly easier if I put all the decorations on the card BEFORE I did the folding. It turns out I was right. :-)


I can't give you the exact measurements for the paper on top of my base, except for that I took 1/4 inch off the original measurement so that I would see some of the base around my paper.

Now here's my recipe:
Plaid type paper is from Recollections ALL GIRL stack
The solid card stock is all generic card stock
The Happy Birthday is from Inkadinkado
The cupcakes are fromTPC Studio 'Hugs and Kisses'
Stickers from Creative Memories Simply Beautiful color pallate
The doodles were made using the Doodles template from Creative Memories

Hope you enjoy your day and good luck to whomever your favorite team is!
Robin

Tuesday, February 1, 2011

Birthday card for my pop

Hi all,

My Dad's 63rd birthday is this week so I wanted to make him a birthday card. I have been wracking my brain about what to put on the card.

Finally, I looked at my CM Reminisce Accents cartridge and decided that I wanted to use the scrolls from the cart.


Recipe:
Orange card stock is from a stack from Wal-mart (can't remember it's name)
Brown is from a card stock pack from Michaels
Red (scrolls) is generic
The scrolls are cut at 1 1/2 inches from CM Reminisce Accents cart
Used CM chalking brown ink to ink the paper tear
Happy Birthday stamp from Inkadinkado
Generic black ink

I hope he likes it.

If you are somewhere with the horrible snow, keep safe and warm.

Until later,
Robin

Sunday, January 30, 2011

Announcing the launch of Let's Cricut

Hi all,

This weekend a new resource for all us Cricuter's was launched called Let's Cricut. The intenet of this group is to inspire and help all levels of Cricut users. Stop by and have a look.


Let's Cricut

Have a great weekend,
Robin

Wednesday, January 26, 2011

My Pink Stamper Super Yummy Challange

Evening all,

Over on My Pink Stamper it is Imagine Pink Wedensday. Her challange was to make something super yummy. I don't have a Imagine, but she said the Cricut users can play along too. So here is my creation:


Receipe:
 - all cuts came from Creative Memories Cricut Cartirdge Cheerful Seasons
 - saying is 1 1/2 inches
 - watermelon is 2 inches
 - all cardstock is from scraps
 - I used the Creative Memories white chalking ink on the watermelon and on the title
 - card base is 4 1/2 by 7

When I cut the watermelon, I went to brown for the title because I thought of the dirt here in AZ. Then I figured it should be on yellow card stock for the sun. I used the chalking ink on the watermelon because you can always see some white on them. Then, he he, I figured if I was going to make the card yellow for the sun, I should put the chalking innk on the title too for the gallons of sun block I use in the summer.

Enjoy your evening!
Robin

Monday, January 24, 2011

My Pink Stamper Birthday Challange

Evening all,

Technically, this is not two posts in one day because I started the other one last night but couldn't get it to post until this morning.

So, today is Robyn's birthday and over at My Pink Stamper  she has a challenge up for her birthday. Her challenge was to make a birthday card.

This worked out well for me because Wednesday is a friends birthday so I made her a card.


The butterfly is from the Gypsy Wanderings pre-loaded cart and is cut at approx 2 1/2 inches. The 'Happy Birthday' is from a generic stamping set.

My new favorite Cricut 'toy' was used for the name. I am loving the Cricut inks for the Expression - will be getting the other inks as soon as I can. The font for the name is Gyspy Font and is about 1 1/2 in height.

All of this is on a 5 1/2 x 4 1/4 cream card stock layer. The card is 5 1/2 x  8 1/2.

Hope you all enjoy and have a good night!
Robin

Halloween in January

Good morning,

I think I finally succeeded in shooting, editing, and uploading a video - go me! Please be kind, this is my first one. Just in case it doesn't work, here is a pic also.


And, here's the video:
The recipe is:
  • Pumpkin comes from Gypsy Wanderings and is cut at 2.53
  • Used the brown, Cricut Ink for the Cricut Expression
  • Brown base cardstock from a cardstock pack from Michaels
  • Orange for the pumpkin came from Colorbok Textured Cardstock from Wal-mart
  • Brown cardstock from layer 1 and the black for the pumpkin are both generic cardstock
  • Stamps are from a stamp pack by Heidi Grace designs - Halloween (from Michaels
Hope you enjoy and have a good rest of the evening!
Robin

PS - while waiting for my video to upload I finally got a chance to look at the final rendered video and it looks like there is some pixelating (is this how you spell this?). On my end it doesn't look like it is through the whole thing, but if it is, let me know and I'll pull the video down. 

Saturday, January 22, 2011

Got my blog badge!!!!!!

Through a very helpful blog http://jenieshell.blogspot.com/2008/11/tutorials.html I figured out how to make a blog button. Since I don't have Adobe Photoshop and am not great in the Paint program, I just used one of my photos I had a taken of a project. Feel free to grab my button over on the side.

If you want to make your own badge and have questions, reach out to me and I'll try and help.

Have a great evening!
Robin

Fluttering by to say hi

Happy Saturday!

I was so productive today - did chores (ugh), made the cards for my card exchange (can't post them till after 2/10, but they are super cute), and made a Just Because card for my BFF. It was so cute, I just had to share. :-)

My BFF works at an arboretum and told me once about all the butterflies. When I saw this image on the cart I thought of her and about the fact that in January, there probably aren't any butterflies out. So I thought she might enjoy this.


Recipe:
white card stock base 5 1/2 x 8 1/2
Butterfly:
  • Cut from Cricut Cartridge Creative Memories Cheerful Season at 3 inches
  • All layers come from generic card stock (layer 1 - cream, layer 2 - purple, layer 3 - teal, and layer 4 - pink
Embossing done with a Cuttlebug Embossing folder - paper 5 1/2 x 4 1/4
Stamp from Hero Arts (at Michaels) Everyday Sayings

Hope you enjoy and have a great weekend!
Robin

Tuesday, January 18, 2011

Birthday card for an awesome sister

Hi everyone,

Here's hoping that my sister doesn't come across my blog, because I just had to share the card I just made for her (belated) birthday.

Maybe some day I will figure out how to edit a video so that I can post them. Until then, I'll just use photos.


Reciepe:
Flower
  • red cardstock from Creative Memories
  • dark green, light green, and pink are generic cardstock
  • white on edges is white chalking ink from Creative Memories
  • Cut from Indie Art cartridge at 5.12 inches (used Gypsy, sorry for the odd mesaurement)
Card base:
  • 5 1/2 x 8 1/2 white cardstock
  • black pattern paper is 5 x 4 and is from Recollections All Girl slab
Have a great evening everyone!
Robin

Sunday, January 16, 2011

Pay it Forward 2011 - Part I

Hi all,

This is part of my contribution for the Pay it Forward 2011 project. At the begining of the year a few people were posting on Facebook about hand making something and sending it to the first five people who commented on their post. Then that person in turn put the same thing on their status in Facebook.

So for my people, I am making a four card set (with envelopes of course) and a box for it to go in. This post is the first card.


Reciepe:
Brown cardstock 5 1/2 x 8 1/2
Taupe or light brown (2nd layer 4 x 5
Frog (Cricut Lite Playtime) cut at 2 inches (paper from a cardstock paper kit)
Get Well (Classic Cricut Font) cut at 1 1/12 inches
Base - beige (cardstock)
Top Layer - All Seasons (slab) from Michaels
Handwritten message - brown fine tip Creative Memories pen
Adhesive - Creative Memories Tape Runner and Precison Point Adhesive Pen

Hope you enjoy!
Robin

Saturday, January 15, 2011

My Pink Stamper Blog Hop Project

Hi all,

I created a video for this project but am having some technical issues. So here's a picture for now:


Recipe:
Pink card stock for the base 5 1/2 x 8 1/2
Brown card stock - 2nd layer 5 1/4 x 4
light purple card stock - 3rd layer 2 1/2 x 5
Cricut Lite Playtime - pig cut at 2 1/2 inches
border punch bubbles by EK
stamp TPC Studio 'Hugs and Kisses'

Once I get my technical issues resolved I'll get the video posted.

Enjoy the rest of your day!
Robin

Friday, January 14, 2011

My Pink Stamper First Ever Blog Hop!

Hi everyone! I am having a blast participating in the first montly blog hop on the My Pink Stamper blog. Make your way over there. I'll post about my project for it later.

My Pink Stamper link: http://www.mypinkstamper.com/

Robin

Monday, January 10, 2011

The Launching of my blog

Welcome to the first posting on my blog. Right now the blog is pretty sparse because I am doing this from my phone. I am in the process of bring my computer back to life. I am a relatively new Cricut user so my hope is that you can learn with me. Stay tuned for more posts and, hopefully, a video (once I figure out how to do it).

Night,
Robin